Vegan

Cauliflower “Couscous” with Asparagus and Peas

In this brightly flavored side dish, cauliflower stands in as a wheat-free alternative to couscous. With cauliflower as the backdrop, all of the fresh spring flavors shine through. 

Ingredients

  • 1 head cauliflower
  • 12 ounces asparagus
  • 10 ounces frozen peas, thawed
  • 1/3 cup pine nuts
  • Zest and juice of one lemon
  • 2 tablespoons olive oil
  • 1 small shallot, minced
  • 2 tablespoons mint leaves, julienned
  • 1 teaspoon thyme leaves, chopped
  • Salt and freshly ground black pepper to taste

Preparation

  1. Break the cauliflower florets apart, cutting the larger ones down until all the pieces are roughly the same size. Place the florets in a food processor and use 8-12 quick pulses to reduce the cauliflower size and texture to slightly smaller than a grain of rice.
  2. In a 12-inch skillet, heat 1/2 cup water and a pinch of salt to a simmer. Add the cauliflower in a single layer. Bring back to a simmer, reduce heat a little, cover and cook cauliflower 5 minutes, or just enough to take the raw edge off, but not so much it becomes soft or loses texture. Remove the cauliflower from the skillet and drain in a colander or mesh strainer, then place in a medium serving bowl.
  3. Heat a small, dry skillet over medium heat. Add the pine nuts and stir frequently. Toast just until they smell nutty and have begun to turn golden, about 3 minutes. Remove from heat and set aside.
  4. Remove the woody ends of the asparagus, then cut each spear on the bias into 1-inch lengths. Wipe out the skillet used for the cauliflower, add the olive oil and heat over medium heat. Add the shallot and sauté gently for a couple minutes, until translucent. Add the asparagus and continue sautéing a few minutes more, just until the asparagus is al dente. Add the lemon zest and juice, fresh thyme and salt and pepper and cook another 30 seconds or so.
  5. Add the shallot-asparagus mixture, peas, pine nuts and mint to the cauliflower. Drizzle with a little olive oil and toss gently to combine. Adjust the salt and pepper, and lemon juice to taste. Serve slightly warm or at room temperature.

Jerk Tofu with Pineapple

Tofu takes on full flavored jerk sauce and pairs wonderfully with the sweetness of baked pineapple.

Ingredients

  • 1 pound extra firm tofu, pressed to remove water and cut into 1- to 2-inch cubes
  • 1 pound fresh pineapple, cut into 1- to 2-inch cubes
  • 1/2 cup diced red pepper

Jerk Sauce

  • 1/4 cup fresh lime juice
  • 2 tablespoons red wine vinegar
  • 2 tablespoons tamari
  • 1 tablespoon brown sugar
  • 1 tablespoon hot sauce or habañero sauce
  • 2 tablespoon fresh chives, minced (reserve 1 tablespoon for garnish)
  • 1 tablespoon dried thyme
  • 1 tablespoon Dijon mustard
  • 1 teaspoon ground allspice
  • Pinch of salt and pepper

Preparation

  1. To press tofu: wrap it in a clean, lint-free towel or place it between two plates, then add a 2 to 3 pound weight on top (a cookbook works well) and let it sit for 15 minutes or more to remove excess water.
  2. In medium-sized mixing bowl, combine the jerk sauce ingredients. Reserve 4 tablespoons of the sauce for dressing the tofu when cooked.
  3. Marinate the pressed, cubed tofu in the jerk sauce for 30-60 minutes or overnight.
  4. Preheat the oven to 350 degrees F.
  5. Place the tofu and marinade onto an oiled sheet pan and bake for 20 minutes; then gently stir or flip the tofu and bake for another 15-20 minutes until the tofu is firm and the sauce is absorbed. On a separate oiled sheet pan, bake the pineapple cubes for 20 – 25 minutes until they just start to brown.
  6. Toss the pineapple and tofu together. Drizzle with the remaining 4 tablespoons of jerk sauce and garnish with chives and diced red pepper. Serve over a bed of greens or crisp lettuce.

Serving Suggestion

Double up the sauce recipe, then heat the sauce, tofu and pineapple together in a skillet and serve warm over steamed rice, or as a wrap sandwich, with fresh greens and sliced sweet onions.


Reprinted by permission from StrongerTogether.coop. Find articles about your food and where it comes from, recipes and a whole lot more at www.strongertogether.coop

Eggless Chocolate Mousse

A true mousse is an airy concoction, in which rich chocolate is held aloft by thousands of tiny bubbles. Aquafaba does an amazing job of lifting and holding a gorgeous egg-free whipped texture.

Ingredients

  • 4 ounces semisweet vegan (optional) chocolate, not chips
  • 1/4 teaspoon cream of tartar
  • 1/2 cup aquafaba
  • 2 tablespoons sugar

Preparation

  1. Melt the chocolate and allow it to come to room temperature.
  2. In a stand mixer with the whisk attachment, or a large bowl with an electric mixer, combine the cream of tartar and aquafaba. Mix on low just to combine, then raise the speed to high. Beat for 10 minutes, until the mixture reaches firm peaks. Sprinkle in 1 tablespoon of sugar and beat for 2 minutes, sprinkle in the remaining sugar and beat for 3 more minutes.
  3. Drizzle the chocolate gently over the aquafaba mixture, and use a rubber spatula to gently fold the chocolate into the whip. It will deflate quite a bit, but stay fluffy. Transfer to goblets, a bowl, or storage tub and refrigerate until set, about 30 minutes, then serve.


Authored by Robin Asbell. Reprinted by permission from StrongerTogether.coop. Find articles about your food and where it comes from, recipes and a whole lot more at www.strongertogether.coop

Aquafaba Meringue Pie

This is an epic pie. It takes a little time to make all the components and assemble, but the tangy filling and stunning toasted meringue on top is worth the effort. You can make the crust and the filling a day ahead and refrigerate, then whip up the meringue on the day of serving for a pie that is sure to impress.

Ingredients

Crust

  • 1/2 cup unbleached flour
  • 1/2 cup whole wheat pastry flour
  • 1/2 teaspoon salt
  • 1/2 stick vegan margarine (not soft spread)
  • Up to 1/2 cup ice water

Filling

  • 1 15-ounce can coconut milk
  • 1 1/4 cups sugar
  • 1 teaspoon vanilla
  • 1/2 teaspoon agar powder
  • 2 pinches turmeric or a few drops yellow food coloring
  • 3/4 cup fresh lemon juice
  • 2 tablespoons fresh lemon zest
  • 6 tablespoons cornstarch

Meringue

  • 3/4 cup aquafaba
  • 1/2 teaspoon cream of tartar
  • 3/4 cup sugar, ground and divided (see Tips & Notes)
  • 1 teaspoon vanilla

Preparation

Crust

  1. Heat the oven to 400°F. In a large bowl, combine the flours and salt, and whisk to combine. Using the large holes of a grater, grate the cold vegan margarine into the flour mixture, tossing to coat the shreds with flour. Work the margarine in just a little by squeezing the mixture with your fingers to break the shreds into smaller pieces, about the size of peas. Sprinkle in about 3 tablespoons of ice water, fluffing the mixture with a fork. Add water a tablespoon at a time, and start to gently turn and squeeze the dough as it forms. Once all the flour is moistened and the dough starts to hold together in a ball, flatten the dough ball to form a disk.
  2. Flour the counter and roll out the dough to fit in a 9-inch deep pie pan. Place the dough into the pie pan and flute the crust. Chill half an hour.
  3. Line the crust with foil and fill it with dry beans or pie weights. Bake for 20 minutes. Remove from the oven and remove the weights and foil. Return the crust to the oven for 15 minutes more until the crust is fully baked, crisp, and golden. Remove from the oven and cool completely.

Filling

  1. Pour the coconut milk into a 2-quart pot, and whisk over low heat to melt any lumps. When melted, whisk in the sugar, vanilla, agar powder and turmeric or yellow food coloring. Increase the heat to medium and bring to a boil, then reduce to hold a gentle simmer. Cook, whisking occasionally, for 5 minutes, to melt the sugar and agar completely.
  2. In a cup, whisk the fresh lemon juice with the cornstarch. Slowly pour into the simmering pot, whisking until the mixture thickens and comes to a boil. Lower the heat and whisk for 1 minute more to thicken. Stir in the lemon zest. Scrape the filling into the cooled pie crust and place in the refrigerator to set.

Meringue

  1. Preheat the broiler. Place a rack so that the top of the pie (it will be tall) will be about 3 inches from the heat. For the meringue, place the aquafaba, cream of tartar and 1/4 cup sugar in a stand mixer fitted with a whisk attachment, or a large bowl with an electric beater. Mix on low for a minute to combine well, then turn the speed to medium-high. Whip for 10 minutes, until the mixture is light and glossy. Gradually whip in the remaining sugar, a tablespoon at a time, sprinkling the sugar very slowly over the surface of the mixture for at least a full second before adding the next tablespoon. The mixture will be billowy and shiny. Whip in the vanilla at the end, just to mix it in well.
  2. Dollop the meringue mixture over the lemon filling and spread it decoratively. Don't make very deep indentations in the meringue, as the broiler will not reach them to brown them. If you have a creme brulee torch, you can make any shapes you want and use the torch to brown everything evenly.
  3. To brown the meringue, place on the rack and leave the door open as you monitor the browning, turning the pie every few seconds. It will brown very quickly, so don't look away. As soon as it is golden and toasted, remove the pie from the oven.
  4. Refrigerate the pie to set the topping for at least an hour before slicing. Serve cold. Keeps in the refrigerator for up to 4 days.

Tips & Notes

To prevent grittiness in meringue, it’s best to use sugar that’s more finely ground than standard granulated sugar. For a 3/4 cup yield measure out 3/4 cup plus an additional 2 teaspoons, to compensate for smaller granules. Grind the sugar for about 30 seconds in a blender, food processor or clean coffee grinder. Do not overgrind or you’ll end up with powdered sugar.


Authored by Robin Asbell. Reprinted by permission from StrongerTogether.coop. Find articles about your food and where it comes from, recipes and a whole lot more at www.strongertogether.coop

Cooking with Aquafaba

Thank vegans for this exciting new phenomenon. 

What is aquafaba?

Aquafaba is actually something we have been pouring down the drain for years. Also known as chickpea water, aquafaba (derived from the Latin word "aqua" for water, and "faba" for beans) is the liquid that forms when you cook dried chickpeas.

With a little help from sugar, starch, and a little something acidic to help stabilize it, aquafaba can be whipped up to a lofty peak, with nearly the same structure as whipped egg whites. 

How to make aquafaba

Via Creative Commons

Via Creative Commons

Many aquafaba recipes call for draining a can of cooked chickpeas to get started. That is certainly easy and it works pretty well, but you can actually make better aquafaba at home from dried chickpeas.

  1. Start with 2 cups dried chickpeas, sorted and cleaned, a piece of kombu seaweed, and water. Kombu is important, as it adds some minerals that make the aquafaba work better.
  2. Use 6 cups of water, and cover the pan so you don't boil off too much liquid. To get the best results, use a slow cooker or stovetop, not a pressure cooker. Long, slow cooking extracts the most active ingredients from the beans.
  3. Slow cook on low for 8 hours or on the stove top for about 4 hours.
  4. When the beans are very tender but not falling apart, they are done.
  5. For best results, refrigerate the whole pot so that the beans can continue to marry with the aquafaba. You can strain them immediately after cooking, if you prefer.
  6. Discard the kombu.
  7. Measure the strained aquafaba, and if it is more than 3 cups, put it in a pot on the stove and boil it to reduce it down and thicken it to about 2 1/2 to 3 cups.
  8. Refrigerate for up to a week, or portion and freeze it. Save the cooked chickpeas for another use.

Aquafaba uses

When substituting with aquafaba, remember it has none of the fat other substitutes may have. Use aquafaba as a vegan egg white substitute or in cakes and meringues. Aquafaba is a great mayo starter that can be easily blended with garlic and herbs to make aioli for dipping, meat, or seafood.

Recipes that call for an egg or two to bind them are your best bets, like meat or nut loaves, veggie burgers, or savory breads. You can blend part tofu and part aquafaba with seasonings, then scramble to make a softer, lighter version of a tofu scramble.


Authored by Robin Asbell. Reprinted by permission from StrongerTogether.coop. Find articles about your food and where it comes from, recipes and a whole lot more at www.strongertogether.coop

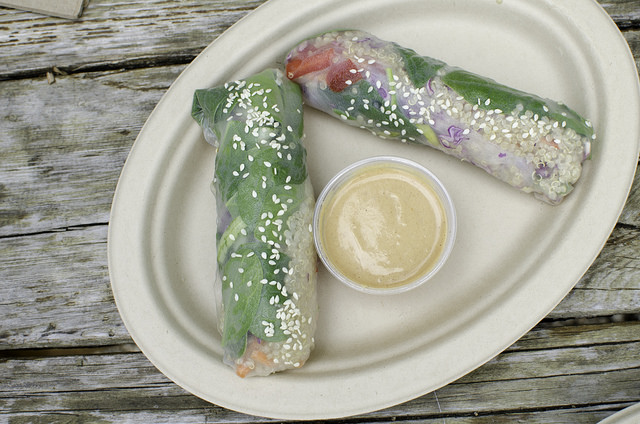
Springtime Spring Rolls

Spring rolls are a fun and delicious way to enjoy a wide variety of fresh produce and leftovers you have on hand.

Ingredients

  • 1 package spring roll wrappers (see Tip)
  • 1 pound tofu or leftover cooked meat
  • 2 cups cooked rice or wild rice
  • 3 cups assorted veggies, such as:
  • kale, shredded cooked or raw
  • spinach, cooked or raw
  • carrots, shredded or thinly sliced
  • cucumbers, seeded and thinly sliced
  • kohlrabi, peeled and thinly sliced or shredded
  • cabbage, shredded cooked or raw
  • green onions, thinly sliced
  • red peppers, thinly sliced
  • cilantro, chopped
  • Sesame Orange Sauce or Maple Dijon Sauce

Preparation

  1. Place all filling ingredients in separate bowls or on large baking sheet
  2. Fill a separate baking sheet or large pie pan with 1/2-1” of warm water, and place 2 damp kitchen towels unfolded on either side of baking sheet. One at a time, place dried spring roll wrappers in the water for about 30 seconds (you can move it around or just let it sit). Remove the spring roll wrapper and place it on one of the towels (which will soak up some of the extra water).
  3. Place your desired fillings (about 2 tablespoons rice, handful of veggies and 1/4 cup protein) on bottom third of wrapper closest to you. Roll the bottom of wrapper over the fillings (away from you) and pull the roll back towards you to tighten the wrap over the fillings. Fold in the right and left ends and roll the wrap away from you—just like a burrito—to complete. Repeat with the remaining wrappers.
  4. Serve with Sesame Orange Sauce or Maple Dijon Sauce for dipping.


Authored by Molly Herrman. Reprinted by permission from StrongerTogether.coop. Find articles about your food and where it comes from, recipes and a whole lot more at www.strongertogether.coop

Chocolate Covered Frozen Bananas

Via Kara Stout

Via Kara Stout

Ingredients 

  • 4 ripe (but not brown) Equal Exchange bananas, bottoms trimmed, but unpeeled
  • 6 ounces Equal Exchange Organic Dark Chocolate, broken up (choose your favorite bar)
  • 1/4 cup cream (or vegan option= 1 tablespoon coconut oil)
  • 1/2 cup chopped topping of your choice (nuts, candied ginger, crushed cookies, coconut, etc.)

Preparation

  1. Peel bananas. Pierce each banana lengthwise with a wooden skewer freeze for at least 15 minutes, or wrap tightly in plastic or foil and freeze for up to a week.
  2. Melt the chocolate in a double boiler (or self made double boiler), a small saucepan over very low heat, or the microwave. Whisk in the cream or coconut oil and transfer the chocolate mixture to a shallow bowl. If you're using nuts, put them on a plate next to the melted chocolate.
  3. Peel the plastic / foil off bananas, dip them first in the chocolate covering the banana completely, let the chocolate drip off and cool slightly then sprinkle with toppings. Wait a few minutes and then place bananas on a piece of parchment paper in the freezer. Repeat with all of the bananas. The chocolate will cool quickly, so if necessary, reheat chocolate.
  4. Freeze bananas for 30 minutes or until chocolate is hard. You can put them in a wax- paper-lined airtight container and freeze them for longer. 

Banana chocolate pieces modification: Peel bananas, cut into 1-2 inch chunks. Follow steps 2-4, but leave pieces on wax paper in freezer until chocolate is hard, then store in an airtight container.


Reprinted by Equal Exchange.

DIY Kombucha

DIY Kombucha

A popular item for Mariposa shoppers, Kombucha is a bubbly, refreshing brew that also serves as a source of healthy probiotics.

Making kombucha can also be a fun and satisfying DIY project. The only challenge can be finding a scoby, the Symbiotic Culture Of Bacteria and Yeasts that floats in your brew, infusing the liquid with good bacteria. To find a scoby, put the word out to your neighbors, friends, and fellow Co-op shoppers. Anyone who brews on a regular basis will have extras. Another strategy is to look at the bottles of plain, unflavored kombucha and select the one with the largest floating blob of scoby. Strain the drink, and use the contents of the strainer as your scoby culture. The starter tea, or already-brewed kombucha, is essential to acidify the brew enough to keep less desirable bacteria from flourishing, so don't skimp on this ingredient.

Ingredients

  • 14 cups purified water
  • 4-8 teabags (white, green or black, not caffeine-free herbal teas) or 4-8 teaspoons loose tea
  • 1 cup sugar
  • 2 1/2 cups starter tea (already-made kombucha; you can use bottled)
  • Scoby

Equipment

  • 1 gallon jar or crock, no metal
  • Thermometer
  • Strainer
  • Cloth to cover jar and rubber band or string to secure it
  • Bottles with good lids for finished kombucha

Preparation

  1. Start by sanitizing your jar, strainer, measuring cups and spoons and stirring spoon; either run them through the dishwasher or boil enough water to pour into the jar, drop the spoons and cups in, and then drain. Pour boiling water over the strainer. Let dry. Wash your hand thoroughly; don't use antibiotic soap.
  2. In a large pot, bring 2-3 cups of the purified water to a boil. Add the teabags or loose tea and steep for about 5-10 minutes, then remove the teabags, or strain into the clean one gallon jar. Stir the sugar into the hot tea until dissolved, then add the remaining water. Use your thermometer to check the temperature of the tea—you need it to drop to under 85⁰F. When the tea is cool, slip the scoby into the mixture. It should float, if it falls to the bottom and stays there it may be dead.
  3. Cover the jar with cloth and secure with the rubber band or string. Keep the jar in a warm spot; the kombucha will brew more quickly at 75- 80 degrees. If you live in a cooler climate, you may want to invest in a warming device, like a brew belt or a seed sprouting mat that doesn't get above 75 degrees. The kombucha takes 7-9 days in a warm room, but takes up to two weeks in a cool room.
  4. Check the kombucha daily. A layer of scoby should form on the surface, making a thin film at first, then growing thicker. Floating yeast colonies will form, and as your kombucha starts to bubble, they will rise and fall. After the first few days, put a straw down the side, to avoid disturbing the surface, and take a taste. At first it should taste like sweet tea, and gradually become less sweet and more fizzy, like plain bottled kombucha. It will smell like cider vinegar, but not taste that sour. If it starts to taste very sour, it is overdone, and some of the good bacteria are dying off.It is still useful as vinegar, so don't throw it away. When it is ready, remove the scoby and bottle the kombucha.
  5. If your scoby does not float, or a skin never forms on top of the brew, or any kind of visible mold occurs, discard and start over.
  6. Keep your scoby at room temperature in enough plain brewed kombucha to cover by an inch, or start a new batch immediately. They can keep, in a dark spot like a cupboard,for three months, as long as you keep replenishing the kombucha.
  7. For bubbly kombucha, bottle the tea with a strong lid and leave it out to carbonate itself by continuing to ferment overnight. Be very careful, since the bottles can explode. Some brewers recommend using plastic bottles for this process. When the plastic bottle becomes very firm when squeezedthe kombucha is done. Chill the tea to stop the action. Drink cold. The kombucha should keep for a month.
  8. To flavor your kombucha, pour flavored waters or juices into the bottles before adding the finished kombucha, or put slices of ginger root or zest right in the bottle.


Authored by Robin Asbell. Reprinted by permission from StrongerTogether.coop. Find articles about your food and where it comes from, recipes and a whole lot more at www.strongertogether.coop

Heirloom Tomato Gazpacho

This refreshing summer soup is a delicious way to celebrate juicy seasonal tomatoes.

Heirloom_Tomato_Gazpacho_0.jpg

Ingredients

  • 2 pounds ripe heirloom tomatoes, roughly chopped
  • 1 cucumber, seeds removed, roughly chopped
  • 1 small red onion, chopped
  • 1 green bell pepper, chopped
  • 2 tablespoons minced garlic
  • 1 jalapeño pepper, chopped
  • 1 cup cubed bread (French or rustic bread)
  • 2 tablespoons red wine vinegar
  • 2 tablespoons lime juice
  • 4 tablespoons olive oil
  • 2 tablespoons chopped fresh cilantro
  • Salt and black pepper to taste

Preparation

Combine all ingredients in a blender (in 2 to 3 batches, as everything will not fit into the blender at once). Blend until very smooth. Place in a bowl, stir the blended batches together and refrigerate for a few hours to allow the flavors to meld. Taste for salt and black pepper and serve chilled.

Serving Suggestion

A summer favorite, this Spanish soup makes a refreshing and simple lunch with a green salad and crusty bread or alongside a meze platter. You can sweeten the dish by adding some cubed fresh melon or strawberries. Gazpacho is best served slightly chilled, not ice cold.

Total Time: 1-3 hours; 20 minutes activeServings: 6

Mango & Berry Popsicles

Coconut and fresh fruit make a perfect treat for a hot day. Use any combination of fresh fruit and coconut water - we're using mango, raspberries, and blueberries. Popsicles are best using a popsicle mold and popsicle stick, however, smaller "popsicles" can be made using an ice tray.   

IMG_85581.jpg


Ingredients

  • 3 mangos (about 3 pounds), peeled, pitted and diced
  • 6 ounces raspberries 6 ounces blueberries
  • 2 cups coconut water
  • 2 tablespoons light agave nectar

Preparation

Gently push raspberries into bottom of Popsicle mold. Place diced mango into mold on top of raspberries, top with blueberries. In a liquid measuring cup, mix coconut water and agave nectar, pour into each mold, about ¼ inch from the top. Insert Popsicle sticks into each pop mold. Freeze overnight. Remove from molds and serve immediately.