Kid-friendly

Apple Raspberry Nachos

Whip up these fun apple nachos for dessert or a sweet afternoon snack and don't be afraid to get creative. Toast the nuts and coconut, replace the nuts with granola or crushed graham crackers, drizzle the apples with honey or caramel sauce, top with ice cream, sprinkle with cinnamon. If you have extra raspberry sauce, swirl it into the yogurt dip.

Apple_Raspberry_Nachos_0.jpg

Ingredients

  • 1 cup frozen or fresh raspberries

  • 1 tablespoon maple syrup

  • 1/2 cup chocolate chips

  • 2 large Honeycrisp apples, halved, cored and sliced thin

  • 1/4 cup pecans, chopped

  • 2 tablespoons shredded coconut

  • 2 tablespoons plain or vanilla yogurt

Preparation

In a small pot, simmer the raspberries and maple syrup for 5 to 10 minutes, stirring frequently. Remove the raspberry sauce from the heat and pour into a small container through a fine mesh strainer to remove the seeds. (Tip: Use the back of a heavy spoon to push the raspberry sauce through the strainer.) Set aside the finished sauce. Melt the chocolate chips either in a double boiler or by microwaving for about 3 minutes on low, in a microwave-safe bowl. To build the nachos, spread out or overlap the apple slices on a platter or large plate. Lightly drizzle the apple slices with the melted chocolate and raspberry sauce, sprinkle pecans and coconut over the top, and serve with yogurt as a dipping sauce.

Raspberry Agave Sorbet

Sorbet is a refreshing and light alternative to ice cream. Try it layered in parfaits, floated in berry sangria, or on top of another berry desserts, such as cobbler. In this version, using agave syrup means that you can skip the traditional step of making a syrup from sugar, since agave dissolves in cold water.

Raspberry Sorbet

Ingredients

  • 12 ounces frozen or fresh raspberries
  • 1/2 cup light agave syrup
  • 1/2 cup water
  • 1/2 teaspoon vanilla

Equipment

  • Ice cream maker or food processor

Preparation

  1. If using an ice cream maker, have it chilled and ready to go (if using the freezer method, have an ice cube tray or cookie tin lined with parchment paper ready to go). Place a fine wire screen strainer over a bowl, which you'll use to strain the raspberry puree.
  2. In a food processor or blender, puree the raspberries until smooth. Use a rubber spatula to scrape the puree into the wire strainer, and then to press the puree through. Scrape and move the fruit pulp until all you have left are seeds. You should have about one cup of puree. Stir in the agave, water and vanilla, then chill until very cold.
  3. Use the ice cream maker to freeze the sorbet. If desired, transfer to a storage tub and freeze until ready to use. (If using the freezer method, pour the sorbet mixture into the ice cube trays or onto the parchment lined cookie tray and freeze. Break the frozen sorbet mixture into chunks, if using a cookie tray, and puree the chunks in a food processor before serving.)


Photo via Creative Commons. 

Authored by Robin Asbell. Reprinted by permission from StrongerTogether.coop. Find articles about your food and where it comes from, recipes and a whole lot more at www.strongertogether.coop.

DIY Quick Pickles

Pickling can be just that—a pickle. True pickling is an ancient miracle for food preservation, but involves a drawn-out fermentation process requiring canning equipment, sterilization procedures and a whole lotta waiting around.

But, did you know that there’s a fast and easy way to preserve and chill your fresh garden veggies? Follow these quick pickling steps for those of you not ready to go all in. 

DIY Quick Pickle

1. Pick your pickle

Although cucumbers are the most common for pickling, you can pickle almost any vegetable such as baby carrots (not the bitty mature carrots which you find in packages, but miniature immature ones with the skin still on), shallots, onion, asparagus, cauliflower, green beans, zucchini, okra, and beyond. The fresher and crispier the produce, the better the final product.

2. Prep the potion

The main ingredient in pickle brine is vinegar. White vinegar is most common, but you can also use cider vinegar or wine vinegar. Balsamic is not recommended as it’s too syrupy. Combine 1 cup vinegar with 1/2 cup water in a saucepan. Instead of diluting the vinegar with water, try including a 1/2 cup of white or brown sugar with a dash of cinnamon.

Add a few pinches of salt. Salt draws moisture out of the vegetables and encourages the growth of useful bacteria. 

5. Spice it up 

This is where it gets fun. Many "pickling spice" blends are available and work beautifully, but consider a visit to the bulk aisle at your local food co-op to customize your blend. Mustard seed, dill seed, dry coriander seed, red pepper flakes, bay leaf, black peppercorns and garlic are all great places to start.

Combine all the ingredients in the saucepan, stir to dissolve, and bring to a boil.

3. Prep your veggies

Trim off any inedible pieces of your vegetable (e.g., the ends of green beans or root ends of onions). If you're cutting your vegetables into pieces, make sure they're all about the same size for pickling consistency.

Leeks and carrots make great pickled veggies.

Leeks and carrots make great pickled veggies.

4. Submerge and chill

Place your vegetables in a clean, dry container. Glass jars are the best because they won’t absorb any odors from the pickles.

Pour the boiling brine into the jar and submerge the veggies completely (you can add water to bring up the level if needed). Refrigerate for at least one hour and let the brine work its charms. The longer you brine, the tastier the pickle.

Depending on your veggie, quick pickles will keep in the fridge for weeks to a few months. 


Reprinted by permission from StrongerTogether.coop. Find articles about your food and where it comes from, recipes and a whole lot more at www.strongertogether.coop.
 

Green Bean Fries

These green bean “fries” are perfect as a snack or served along with sandwiches. Kids love them with creamy low-fat dressing as a dip.

Ingredients

  • 1 pound green beans, trimmed
  • 2 eggs
  • 1 cup milk
  • 1 cup flour
  • 2 cups bread crumbs
  • 1/2 cup grated Parmigiano Reggiano cheese
  • 2 teaspoons garlic powder
  • 2 teaspoons onion powder
  • 2 teaspoons oregano, dried
  • 3 tablespoons lemon zest (optional)

Preparation

  1. Preheat oven to 350 degrees F.
  2. In a medium stockpot, bring 3 inches of salted water to a boil. Add the green beans and cook for 3 minutes, remove from heat, drain and immerse in cold water to cool. Drain and set aside. In a small bowl, combine the breadcrumbs, Parmigiano Reggiano cheese and oregano with the onion and garlic powders.
  3. In a wide bottom bowl, blend together the eggs and milk. Place half the flour on a wide plate, and half the bread crumbs on another plate. Working in small batches, place green beans in the flour and coat well. Remove the beans from the flour, shaking off any excess, and place them into the egg wash and coat well. Use a pair of tongs to remove the beans from the egg wash and place into the breadcrumb mixture. Coat well with bread crumbs and place the coated beans onto a large baking sheet in a single layer. Repeat the steps with the remaining beans.
  4. Bake the beans for 18-20 minutes until crisp, remove from the oven and serve, garnished with fresh lemon zest.


Reprinted by permission from StrongerTogether.coop. Find articles about your food and where it comes from, recipes and a whole lot more at www.strongertogether.coop

DIY: Natural Egg Dye

Easter Eggs

Egg dyeing is a fun way to celebrate this time of year—and it's a tradition that goes way back—as much as 5,000 years when Persians celebrated springtime with eggs colored with plant-based dyes. Plant dyes can be just as useful today and they're plentiful; in fact you very well might have dye-worthy ingredients in your kitchen already.

Here are some great plant-based dyes—fruits, vegetables, spices and flowers.

Items Needed

  • White eggs (or try brown, keeping in mind color results will vary)
  • Egg carton
  • Stock pan(s)
  • Water
  • White vinegar
  • Slotted spoon
  • Natural materials for dyeing (see table).
Natural Egg Dye

Optional: Tape, string, rubber bands, cheese cloth squares, natural beeswax crayons to create designs on eggs, and vegetable oil for an extra sheen. 

Directions

Beet dye including pulp (top), onion skin dye with celery, bay and ivy leaves wrapped in cheese cloth (middle two), turmeric dye with rice wrapped in cheese cloth (bottom).

Hot Bath Method

  1. Place uncooked eggs in a stainless steel stock pan. Add water 2-3 inches above eggs. (When using bottled juice, fill 2-3 inches above eggs. Do not add water.) Add natural dye ingredients and 1-2 tablespoons vinegar per quart of water.

  2. Cover and bring to boil, reduce heat and simmer for 15-20 minutes.
  3. Carefully remove eggs with a slotted spoon and air dry.

Cold Bath Method

The process for cold dyeing is much the same as the hot method except the eggs and dyes are cooked separately.

  1. Simmer the dye ingredients (water, vinegar and dye matter) for 20-30 minutes or longer, until the dye reaches your desired shade.
  2. Allow the liquid to cool and submerge hard-boiled eggs in the dye for at least 30 minutes.
  3. Carefully remove eggs with a slotted spoon and air dry.  

Notes, Tips & Techniques

Color variation

Colors may vary depending on steeping time and foods used to dye eggs.

Deeper colors

The longer the eggs stay in the dye, the deeper the color will be; leaving the eggs in the dye for several hours or overnight (in the refrigerator) is recommended for achieving deep colors. Allow the liquid and eggs to cool before refrigerating and ensure that the eggs are completely submerged in the dye. Eggs will be speckled if the dye matter remains in the liquid. For more uniform colors, remove the dye matter from the liquid, by straining the liquid through a coffee filter, before refrigerating.

Egg flavor

The flavor of the egg may change based on the dye, so if you plan to eat your dyed eggs, a shorter dye bath and fresh ingredients may be preferable.

Drying

Make a drying rack by cutting the bottom off an egg carton and turning it upside down.

Decorating

  • Wrap onion skins around eggs, then wrap the entire egg with a cheese cloth square and secure it with string before placing the eggs in the dye.
  • Wrap string or rubber bands around eggs before dyeing to create stripes (use rubber bands for cold dyeing only).
  • Draw designs on hot, warm or cold hard-boiled eggs with crayons. When using hot or warm eggs, the crayon may melt slightly on contact with the egg (if eggs are hot, hold eggs with a potholder or rag to prevent finger burns). Crayon covered eggs should only be dyed in cold dyes as the crayon wax will melt in hot liquids.
  • Gently wipe dry dyed eggs with vegetable oil to give eggs an added sheen.


Reprinted by permission from StrongerTogether.coop. Find articles about your food and where it comes from, recipes and a whole lot more at www.strongertogether.coop

Spring Greens Pizza

Veggie Pizza

Baked crust is topped with fresh mozzarella, spring greens and chicken for a delightful twist on traditional pizza.

Ingredients

  • 3 tablespoons olive oil
  • 1 teaspoon dried basil
  • 1 teaspoon dried oregano
  • 2 tablespoons minced garlic
  • 3 ounces fresh mozzarella, bocconcini size
  • 1 cup plus 2 tablespoons balsamic vinegar
  • 1 prepared pizza crust
  • 1 15-ounce can crushed fire-roasted tomatoes
  • 1 tablespoon vegetable oil
  • 1/2 pound boneless, skinless chicken tenderloins or thighs
  • 3 cups spring mix lettuce

Preparation

  1. Preheat oven to 400 degrees F.
  2. In a small saucepan over medium heat, reduce 1 cup of balsamic vinegar to 1/4 cup, stirring occasionally. Remove from heat and reserve. Meanwhile, combine the olive oil, basil, oregano and garlic in a small bowl. Let sit 10 minutes.
  3. Brush pizza crust with half the olive oil mixture and bake according to package instructions. Slice the fresh mozzarella into thin slices and add to the remaining olive oil mixture. Toss to coat.
  4. In a medium saucepan, heat 1 tablespoon of vegetable oil over medium-high heat. Add the chicken and brown 2 minutes on each side. Remove the chicken from the pan and reserve. Return the pan to the heat and deglaze with 1 tablespoon water and 2 tablespoons balsamic vinegar. Add the crushed tomatoes and bring to a simmer. Slice the cooked chicken crosswise into 1-inch pieces and add to the tomato mixture. Simmer until sauce has thickened, about 7 minutes.
  5. Remove the pizza crust from the oven. Spread the sauce evenly over the crust and top with marinated mozzarella slices. Cut the pizza into four slices and top each with a handful of spring mix. Drizzle each slice with a tablespoon of the balsamic vinegar reduction and serve.


Reprinted by permission from StrongerTogether.coop. Find articles about your food and where it comes from, recipes and a whole lot more at www.strongertogether.coop

CHOCOLATE CHIP BANANA BREAD

Banana Bread

Ingredients 

  • 2 c. all-purpose flour
  • ¼ c. granulated sugar
  • 1 tsp. vanilla extract
  • 2 tsp. baking powder
  • 1 tsp. baking soda
  • 1 pinch salt
  • 1 bag semi-sweet or bittersweet chocolate chips 
  • 2 c. bananas (2-3 ripe & mashed bananas)
  • ½ c. butter, melted
  • ¼ c. milk
  • 2 eggs
  • Cinnamon for crust (optional)

Preparation 

Preheat oven to 350 degrees. In a large bowl, whisk flour, sugar, baking powder, baking soda and salt. Add chocolate chips.

In a separate bowl, whisk together bananas, butter, milk, vanilla and eggs. Pour over the flour mixture and stir until blended. Grease a 9x5 loaf pan with butter and sprinkle with cinnamon and sugar. Pour mixture into the loaf pan.

Bake for 50 to 60 minutes, until the crust is golden brown and a toothpick comes out clean. Let cool in pan for 15 minutes before turning out onto a rack or serving plate. Serve warm.


Reprinted from Equal Exchange.

Chocolate Covered Frozen Bananas

Via Kara Stout

Via Kara Stout

Ingredients 

  • 4 ripe (but not brown) Equal Exchange bananas, bottoms trimmed, but unpeeled
  • 6 ounces Equal Exchange Organic Dark Chocolate, broken up (choose your favorite bar)
  • 1/4 cup cream (or vegan option= 1 tablespoon coconut oil)
  • 1/2 cup chopped topping of your choice (nuts, candied ginger, crushed cookies, coconut, etc.)

Preparation

  1. Peel bananas. Pierce each banana lengthwise with a wooden skewer freeze for at least 15 minutes, or wrap tightly in plastic or foil and freeze for up to a week.
  2. Melt the chocolate in a double boiler (or self made double boiler), a small saucepan over very low heat, or the microwave. Whisk in the cream or coconut oil and transfer the chocolate mixture to a shallow bowl. If you're using nuts, put them on a plate next to the melted chocolate.
  3. Peel the plastic / foil off bananas, dip them first in the chocolate covering the banana completely, let the chocolate drip off and cool slightly then sprinkle with toppings. Wait a few minutes and then place bananas on a piece of parchment paper in the freezer. Repeat with all of the bananas. The chocolate will cool quickly, so if necessary, reheat chocolate.
  4. Freeze bananas for 30 minutes or until chocolate is hard. You can put them in a wax- paper-lined airtight container and freeze them for longer. 

Banana chocolate pieces modification: Peel bananas, cut into 1-2 inch chunks. Follow steps 2-4, but leave pieces on wax paper in freezer until chocolate is hard, then store in an airtight container.


Reprinted by Equal Exchange.

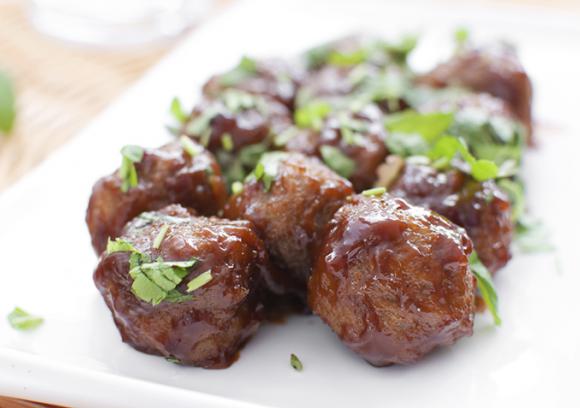
Sweet & Sour Vegetarian Meatballs

These tasty vegetarian meatballs make a delicious appetizer or accompaniment to fettuccine Alfredo or mushroom risotto.

Ingredients

  • 2 large eggs
  • Oil to grease pan
  • 1/2 cup shredded Colby cheese
  • 2 tablespoons minced yellow onion
  • 1/2 teaspoon dried basil
  • 1/4 teaspoon dried sage
  • 1/4 teaspoon salt
  • 1 cup crushed herbed stuffing mix
  • 1/4 cup cottage cheese
  • 6 tablespoons pecan meal (grind about 1/2 cup pecan halves)

Sauce

  • 2 tablespoons canola or vegetable oil
  • 3 tablespoons apple cider vinegar
  • 10 tablespoons apricot jam
  • 6 tablespoons ketchup
  • 1 tablespoons minced yellow onion
  • 1/4 teaspoon dried sage
  • 1/4 teaspoon dried oregano
  • 1/4 teaspoon hot sauce

Preparation

  1. Preheat oven to 350°F.
  2. Oil a sheet pan with sides or an oven-safe casserole dish.
  3. In a large mixing bowl, mix together all vegetarian meatball ingredients. Once thoroughly combined, roll into 1- to 2-inch balls. The mixture should yield approximately 16-18 vegetarian meatballs. Place them in the oiled pan and bake for 15 minutes. Turn them and bake another 15 minutes.
  4. While the vegetarian meatballs are baking, mix together all sauce ingredients in a separate bowl.
  5. After the vegetarian meatballs have baked for 30 minutes, coat them with the sauce and bake another 10-15 minutes. Serve warm.

Serving Suggestion

Goes great with fettuccine Alfredo or mushroom risotto.


Authored by Open Harvest Co-op Grocery. Reprinted by permission from StrongerTogether.coop. Find articles about your food and where it comes from, recipes and a whole lot more at www.strongertogether.coop

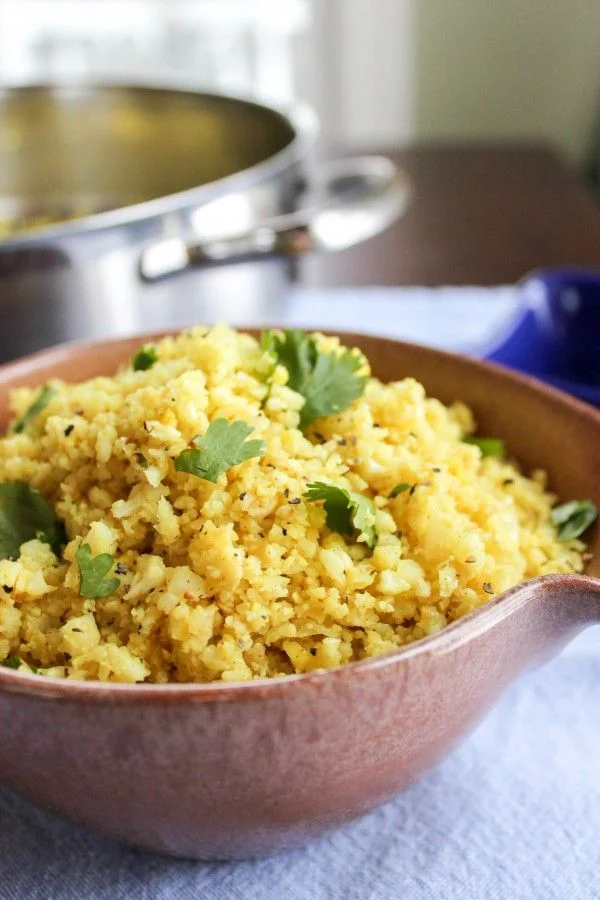
Cauliflower Rice with Spicy Broccoli

Photo credit: Taste Spotting

Photo credit: Taste Spotting

Cauliflower "couscous" is accented with broccoli, zesty curry powder and sweet raisins in this delightful salad.

Ingredients

  • 1 pound cauliflower florets
  • 2 tablespoons olive oil or butter
  • 1/2 yellow onion, thinly sliced
  • 2 cloves garlic, peeled and minced
  • 2 cups broccoli florets
  • 1⁄3 cup raisins
  • 1 15-ounce can chickpeas, drained and rinsed
  • 1 tablespoon curry powder
  • 1⁄3 cup water
  • Juice of 1 lemon
  • Salt and black pepper to taste

Preparation

  1. In a food processor, pulse the cauliflower florets until they resemble coarse grains that look like couscous. Don't over mix! Set aside.
  2. Heat the oil or butter over medium-high heat in a large pot. Add the onion and sauté for 2 minutes. Add the garlic and broccoli and sauté another 3 to 5 minutes. Add the raisins, chickpeas, curry powder and water and stir well. Add the cauliflower “couscous” and cook 3 to 5 minutes more.
  3. Remove from heat and stir in the lemon juice. Taste for salt and pepper and serve warm.

Serving Suggestion

The cauliflower “couscous” is a great way to add a fresh crunch to this warm winter salad. Sweet raisins and zesty curry powder make it a flavorful companion to braised chicken. Add cubed marinated and baked tofu to any leftovers. Use purple or golden cauliflower for extra color. 


Reprinted by permission from StrongerTogether.coop. Find articles about your food and where it comes from, recipes and a whole lot more at www.strongertogether.coop