Budget-friendly

Spiced Squash Pancakes

These moist, deep orange cakes are a breakfast treat, and if you like breakfast for dinner, these would be perfect candidates. Walnuts and maple syrup add crunchy sweetness.

Fall spice pancakes

Ingredients

Syrup

  • 1/2 cup walnut pieces
  • 1/2 cup maple syrup

Pancakes

  • 1 cup whole wheat pastry flour
  • 1/2 cup unbleached flour
  • 4 tablespoons sugar
  • 2 teaspoons baking powder
  • 1/2 teaspoon ground ginger
  • 1/2 teaspoon allspice
  • 1/4 teaspoon nutmeg
  • 1/2 teaspoon salt
  • 3/4 cup squash puree of your choice* (prepared in advance)
  • 1 cup 1% low-fat milk
  • 2 tablespoons vegetable oil
  • 2 large eggs
  • Vegetable oil spray

Preparation

  1. In a 1 quart pot, combine the walnuts and maple syrup, and heat over low heat while you make the cakes. Makes 3/4 cup.
  2. Preheat the oven to 200 F to hold the finished pancakes, if desired.
  3. In a large bowl, combine the whole wheat pastry flour, unbleached flour, sugar, baking powder, and salt. In a medium bowl, whisk the squash, milk, oil and egg. Stir the squash mixture into the flour mixture just until all the flour is moistened, don't over-stir.
  4. Pre-heat griddle or large non-stick skillets, over high heat. Spray with vegetable oil spray just before adding the batter. Use 1/4 cup measure to scoop the batter onto the hot griddle, spreading it out to a 4 inch round with the bottom of the cup. When the batter starts to bubble, turn down the heat to medium. When the edges of the cakes look dry and cooked and the pancake is covered with holes, about 3 minutes, flip the cakes. Cook for a minute or two on the second side, it will not take as long. Flip again and cook for a couple of minutes. Transfer the finished pancakes to a heat safe platter and put in the oven as you finish cooking the rest of the batter.
  5. Serve 3 cakes per plate, topped with a tablespoon of syrup per cake.

* Squash Puree

  1. Preheat the oven to 400 F.
  2. Using your favorite winter squash (such as butternut, acorn, pumpkin, delicata), halve the squash, scoop out the seeds, and place it cut side down on an oiled sheet pan.
  3. Roast at 400 F until tender when pierced with a paring knife.
  4. With a metal spoon, scrape out the cooked flesh and puree in a blender or food processor or mash with a potato masher until smooth.


Authored by Robin Asbell. Reprinted with permission by strongertogether.coop

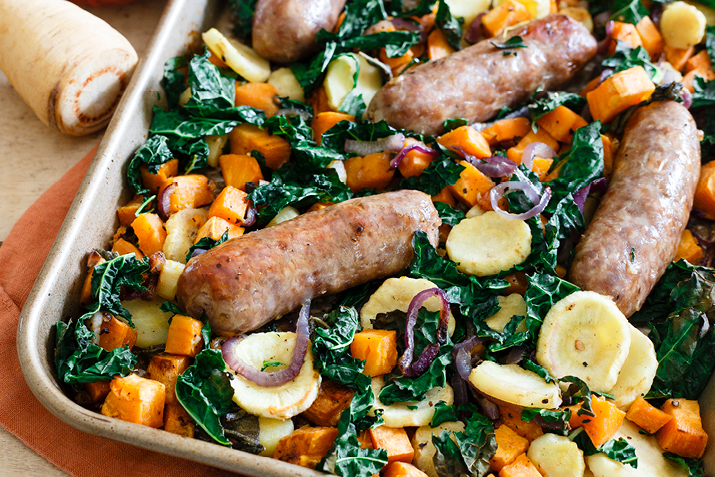
Italian Sausage with Fall Veggies

Easy, filling and flexible, this dish takes full advantage of whatever fall root vegetables you have on hand.

Italian_Sausage_with_Fall_Veggies.jpg

Ingredients

  • 2 medium parsnips, peeled and sliced
  • 1 small sweet potato, cubed
  • 1 small red onion, thinly sliced
  • 4 cloves garlic, peeled and chopped
  • 1 tablespoon fresh sage (or 1 teaspoon dried)
  • 1/2 teaspoon freshly ground black pepper
  • 1/2 teaspoon salt
  • 2 teaspoons vegetable oil
  • 1 pound uncooked Italian sausage links
  • 1/2 bunch kale, stemmed and chopped

Preparation

  1. Heat the oven to 400°F. In a large roasting pan, combine the parsnips, sweet potato, red onions, garlic, sage, pepper and salt, and drizzle with vegetable oil. Toss to coat. Pierce each sausage link four times on one side with a paring knife, then turn over and pierce four more times. Place the sausages on the vegetables and cover the pan tightly with foil.
  2. Bake for 20 minutes, then uncover the pan, stir and turn the sausages, and roast for 15 minutes longer, uncovered. The vegetables should be tender when pierced with a paring knife; if the vegetables are in larger chunks, they may need more time to cook. When the vegetables are tender, add the kale to the hot pan and stir, then roast for 10 minutes longer. Serve hot.

Serving Suggestion

This is an easy and filling fall dish, and the ingredients are very flexible. Substitute your favorite root vegetables for the parsnip and sweet potato, or use any type of link sausage.


Authored by Stronger Together. Reprinted with permission by www.strongertogether.coop

Photo courtesy of strongertogether.coop

Goddess Quinoa Bowl

Veggies, whole grains and Sriracha tahini dressing make this flavorful, easy, one-bowl meal a perfect addition to your weeknight dinner rotation. This recipe is very versatile - swap ingredients for your favorite veggies.

Quinoa Bowl

Ingredients

  • 1 cup dry quinoa or bulgur
  • 1 1/2 cups plus 1 tablespoon water, divided
  • 1/4 cup tahini
  • 1 tablespoon cider vinegar
  • 1 tablespoon Sriracha sauce
  • 1 tablespoon tamari sauce plus 1 teaspoon, divided
  • 1 tablespoon honey
  • 1/2 cup raw unsalted pumpkin seeds
  • 1 bunch Tuscan kale, thinly sliced
  • 2 large carrots, shredded
  • 2 medium avocados, halved and pitted

Preparation

  1. Cook the quinoa or bulgur. In a small pot, bring 1 1/2 cups water to a boil, then add the grain. Return to a boil, and if using quinoa, reduce the heat to low and cook for 14 minutes, covered. For bulgur, bring to a boil for 1 minute, then cover and let stand for 15 minutes. Fluff the finished grain with a fork.
  2. While the grain cooks, place the tahini, cider vinegar, one tablespoon each tamari, honey, Sriracha sauce and water in a small bowl and stir with a fork until smooth. Add a bit more water if the dressing is too thick.
  3. Place the pumpkin seeds in a small sauté pan and swirl over medium-high heat. When they begin to pop and become fragrant, stir in the tamari. The tamari will coat the seeds and the pan will be dry. Transfer to a bowl to cool.
  4. Place a quarter of the cooked grains in each of four low, wide bowls. Arrange the raw kale and carrots on top of the grains, then slice the avocado halves in the skin and carefully scoop them out with a spoon. Fan half an avocado over each bowl. Top with sauce and pumpkin seeds.

Serving Suggestion

Grain and noodle bowls are the way to go for simple, flexible meals. The easy tahini dressing has enough Sriracha sauce to make it exciting, but if you don't like it hot you can always cut the amount in half. Customize with your favorite cooked or shredded veggies, proteins or sauces.


Reprinted by permission from StrongerTogether.coop. Find articles about your food and where it comes from, recipes and a whole lot more at www.strongertogether.coop.

How to choose and store tofu

Soft, firm and extra-firm tofu are not only a delicious source of protein but also provide the basis for everything from sauces to stirfries and scrambles. Shefaly Ravula demystifies the most common types of tofu and offers tips on how to use and store them. She demonstrates how to make an orange dream silken smoothie. Once you have the technique down, customize this creamy treat with your choice of fruits, protein powder or flavorings.

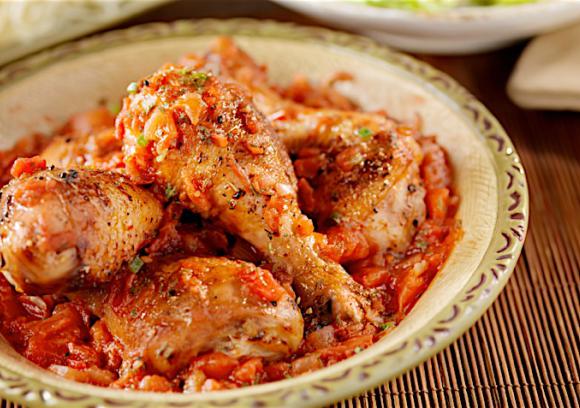
Budget Friendly Slow Cooker Chicken Cacciatore

Alla cacciatora refers to a meal prepared "hunter-style" with onions, herbs, and local veggies. Have dinner ready by the time you get home by prepping the ingredients the night before. 

Slow Cooker Chicken Cacciatore

Ingredients

  • 1 14-ounce can Woodstock diced tomatoes
  • 1 large onion, chopped
  • 1 medium green pepper, chopped
  • 1 medium zucchini, sliced
  • 2 ribs celery, chopped
  • 3 cloves garlic, chopped
  • 1 teaspoon dried basil
  • 1 teaspoon dried oregano
  • ½ teaspoon salt
  • ½ cup dry red wine
  • ½ cup Field Day chicken broth
  • 4 ounces Muir Glen tomato paste
  • 6 chicken legs, skinless
  • 2 cups brown rice

Preparation

In a large slow-cooker, combine the tomatoes, onion, green pepper, zucchini, celery, garlic, basil, oregano, salt, red wine, chicken broth and tomato paste. Stir to mix, then add the chicken legs and press down to cover them with the vegetable and spice mixture as much as possible. Set the cooker on low and cook for 7 hours.

Start cooking the rice on the stove about 45 minutes before the chicken is finished cooking, using approximately 4 cups of water for the 2 cups of rice.

When chicken is cooked, taste and add salt and pepper as needed. Serve a cup of cooked brown rice in a wide bowl or pasta plate, with a chicken leg and vegetable sauce.


Reprinted by permission from StrongerTogether.coop. Find articles about your food and where it comes from, recipes and a whole lot more at www.strongertogether.coop.

Budget Friendly Chana Masala

These flavorful chickpeas are quick and easy; a perfect meal served with rice or naan bread and veggies on the side.

Budget-friendly chana masala

Ingredients

  • 1 ½ cups long-grain brown rice
  • 3 tablespoons Field Day canola oil
  • 1 medium yellow onion, diced
  • 1 clove garlic, minced
  • 1 tablespoon minced fresh ginger
  • 1 tablespoon garam masala
  • 2 tablespoons curry powder
  • 3 tablespoons tomato paste
  • 2 cups water
  • 1 15-ounce can Field Day garbanzo beans, drained and rinsed
  • 2 teaspoons lemon juice
  • 1 teaspoon red pepper flakes
  • 1 large russet potato, peeled and diced
  • Salt and pepper to taste

Preparation

Bring rice and 3 cups of water to a boil in a medium saucepan. Cover tightly and reduce to a simmer for about 40 minutes or until water is absorbed.

Heat oil in a deep frying pan or shallow soup pot. Add onion and cook over medium heat until soft and translucent, then add garlic, ginger, spices and tomato paste. Pour into a blender or food processor and blend thoroughly. Return the spiced tomato paste to the same pan; there will still be a thin coat of oil in it. Heat over medium heat, stirring occasionally, until it turns medium brown and oil separates around the edges of pan. Gradually whisk in water until it makes a thick gravy, about 2 cups. Bring to a boil.

Add potato and salt, and reduce heat to simmer. Cook for about 8 minutes, then add garbanzo beans. Return to a simmer, cover and cook for 10 minutes, until potatoes are tender. Stir in lemon juice and red pepper flakes, and season to taste with salt and pepper. Serve over rice.


Reprinted by permission from StrongerTogether.coop. Find articles about your food and where it comes from, recipes and a whole lot more at www.strongertogether.coop.

Photo courtesy of Johan Bichel Lindegaard
 

Tempeh Tacos

Tempeh, made from fermented soybeans, gives a deep flavor and meaty texture to Dana Tomlin's vegetarian taco filling.

Ingredients

  • 1 pound plain tempeh
  • 1 tablespoon chili powder
  • 1 tablespoon olive oil
  • 3 cloves fresh garlic, minced
  • 1/4 cup water
  • 2 tablespoons tamari
  • Pinch of pepper

Preparation

  1. Crumble tempeh into a small bowl.
  2. Heat oil in a medium sized skillet or sauté pan over medium heat. Add tempeh and cook for 2-3 minutes. Add garlic and cook for 15-20 seconds until aromatic.
  3. Add chili powder, pepper, tamari, and water. Mix well and sauté a few minutes more until liquid evaporates. Note: Add additional oil if tempeh is sticking to pan.

Serving Suggestion

Serve with fresh corn tortillas and your favorite taco fixings.


Reprinted by permission from StrongerTogether.coop. Find articles about your food and where it comes from, recipes and a whole lot more at www.strongertogether.coop.

Cover photo courtesy of Sarah Stierch

DIY Quick Pickles

Pickling can be just that—a pickle. True pickling is an ancient miracle for food preservation, but involves a drawn-out fermentation process requiring canning equipment, sterilization procedures and a whole lotta waiting around.

But, did you know that there’s a fast and easy way to preserve and chill your fresh garden veggies? Follow these quick pickling steps for those of you not ready to go all in. 

DIY Quick Pickle

1. Pick your pickle

Although cucumbers are the most common for pickling, you can pickle almost any vegetable such as baby carrots (not the bitty mature carrots which you find in packages, but miniature immature ones with the skin still on), shallots, onion, asparagus, cauliflower, green beans, zucchini, okra, and beyond. The fresher and crispier the produce, the better the final product.

2. Prep the potion

The main ingredient in pickle brine is vinegar. White vinegar is most common, but you can also use cider vinegar or wine vinegar. Balsamic is not recommended as it’s too syrupy. Combine 1 cup vinegar with 1/2 cup water in a saucepan. Instead of diluting the vinegar with water, try including a 1/2 cup of white or brown sugar with a dash of cinnamon.

Add a few pinches of salt. Salt draws moisture out of the vegetables and encourages the growth of useful bacteria. 

5. Spice it up 

This is where it gets fun. Many "pickling spice" blends are available and work beautifully, but consider a visit to the bulk aisle at your local food co-op to customize your blend. Mustard seed, dill seed, dry coriander seed, red pepper flakes, bay leaf, black peppercorns and garlic are all great places to start.

Combine all the ingredients in the saucepan, stir to dissolve, and bring to a boil.

3. Prep your veggies

Trim off any inedible pieces of your vegetable (e.g., the ends of green beans or root ends of onions). If you're cutting your vegetables into pieces, make sure they're all about the same size for pickling consistency.

Leeks and carrots make great pickled veggies.

Leeks and carrots make great pickled veggies.

4. Submerge and chill

Place your vegetables in a clean, dry container. Glass jars are the best because they won’t absorb any odors from the pickles.

Pour the boiling brine into the jar and submerge the veggies completely (you can add water to bring up the level if needed). Refrigerate for at least one hour and let the brine work its charms. The longer you brine, the tastier the pickle.

Depending on your veggie, quick pickles will keep in the fridge for weeks to a few months. 


Reprinted by permission from StrongerTogether.coop. Find articles about your food and where it comes from, recipes and a whole lot more at www.strongertogether.coop.
 

Grilled Romaine Salad

Use the grill for more than just meat this summer by grilling your salad, too. Romaine is hearty and lends itself perfectly to grilling.

Pile on veggies of your choice for a complete grilled romaine salad. 

Pile on veggies of your choice for a complete grilled romaine salad. 

Ingredients

Salad

  • 1 large head romaine lettuce
  • 1 ear corn
  • 2 slices day-old bread
  • 1/2 avocado, chopped
  • 1/4 medium red onion, thinly sliced
  • 2 tablespoons extra virgin olive oil, divided

Dressing

  • 1/4 cup freshly grated Parmesan cheese
  • 1 tablespoons lemon juice
  • 2 tablespoons extra virgin olive oil
  • 1 tablespoon balsamic vinegar
  • 1/4 teaspoon freshly ground black pepper

Preparation

  1. Make the dressing by whisking together the cheese and lemon juice in a small bowl. Add the olive oil, balsamic and black pepper and whisk again until incorporated. Set aside.
  2. Preheat an outdoor grill or stove top grill pan to medium-low, about 350⁰F.
  3. Place the corn on the grill and grill for about 4-5 minutes per side until the kernels start to char. Remove from grill once the whole ear is slightly charred, cut the kernels off the cob and set aside.
  4. While the corn grills, drizzle the bread with 1 tablespoon of olive oil and place on the grill for about 1-2 minutes per side until just slightly toasted and grill marks appear. Remove from the grill and cut into cubes.
  5. Cut the head of romaine in half lengthwise keeping the core intact. Wash each half thoroughly, gently shake off any excess water and dry well.
  6. Drizzle both halves of romaine (cut side) with the remaining tablespoon of olive oil. Place the lettuce halves on the grill, cut side down and grill for 1-2 minutes per side until the outer leaves just start to wilt and the core has some nice grill marks.
  7. Plate the grilled romaine on a serving platter, top with the grilled corn kernels, sliced red onion, chopped avocado and grilled croutons.
  8. Drizzle the dressing on top and serve warm.

Serving Suggestion

Add chopped hard-boiled egg or cooked chicken for a complete meal.

Goddess Chickpea Salad with Kale

Creamy and crunchy this salad is packed with protein. Enjoy by itself or stuffed in a whole wheat pita. If you don’t have green goddess dressing on hand, substitute your favorite dressing. 

Meal prep trick: place the dressing at the bottom of the mason jar, top with salad to avoid soggy greens.Photo Credit: Food, Pleasure & Health

Meal prep trick: place the dressing at the bottom of the mason jar, top with salad to avoid soggy greens.

Photo Credit: Food, Pleasure & Health

Ingredients

  • 1 can chickpeas, drained
  • 1 cup packed thinly shredded kale
  • 1 cup cherry tomatoes, halved
  • 1/4 cup slivered red onions
  • 1/4 cup green goddess salad dressing
  • Salt and pepper, to taste

Preparation

  1. In a large bowl, combine the chickpeas, kale, cherry tomatoes and red onions. Pour the green goddess dressing over the mixture and toss to coat.
  2. Grind fresh black pepper over it all and mix, then taste and add salt if desired. Serve immediately, or store, tightly covered for up to a week in the refrigerator.

Serving Suggestion

This salad is also delicious wrapped in a tortilla or stuffed in a whole wheat pita. If you don’t have green goddess dressing on hand, substitute your favorite dressing.