Snack

Apple Raspberry Nachos

Whip up these fun apple nachos for dessert or a sweet afternoon snack and don't be afraid to get creative. Toast the nuts and coconut, replace the nuts with granola or crushed graham crackers, drizzle the apples with honey or caramel sauce, top with ice cream, sprinkle with cinnamon. If you have extra raspberry sauce, swirl it into the yogurt dip.

Apple_Raspberry_Nachos_0.jpg

Ingredients

  • 1 cup frozen or fresh raspberries

  • 1 tablespoon maple syrup

  • 1/2 cup chocolate chips

  • 2 large Honeycrisp apples, halved, cored and sliced thin

  • 1/4 cup pecans, chopped

  • 2 tablespoons shredded coconut

  • 2 tablespoons plain or vanilla yogurt

Preparation

In a small pot, simmer the raspberries and maple syrup for 5 to 10 minutes, stirring frequently. Remove the raspberry sauce from the heat and pour into a small container through a fine mesh strainer to remove the seeds. (Tip: Use the back of a heavy spoon to push the raspberry sauce through the strainer.) Set aside the finished sauce. Melt the chocolate chips either in a double boiler or by microwaving for about 3 minutes on low, in a microwave-safe bowl. To build the nachos, spread out or overlap the apple slices on a platter or large plate. Lightly drizzle the apple slices with the melted chocolate and raspberry sauce, sprinkle pecans and coconut over the top, and serve with yogurt as a dipping sauce.

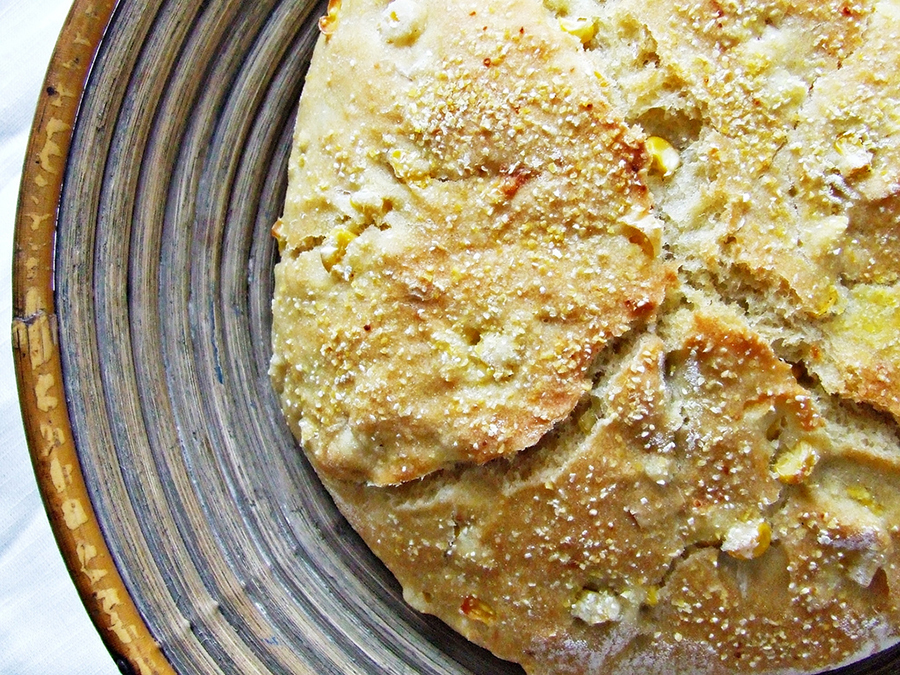
Roasted Sweet Corn Bread

The perfect slightly sweet addition to a main course. Use fresh, non GMO corn for that local flavor or substitute frozen corn in the off season.  

Local non-GMO corn bread

Ingredients

  • 1 ear sweet corn (2 if small)
  • 1 cup unbleached flour
  • 1 cup cornmeal
  • 1/4 cup sugar
  • 1 teaspoon baking powder
  • 1/2 teaspoon salt
  • 1/4 cup melted butter
  • 1 cup plain nonfat yogurt
  • 2 large eggs

Preparation

  1. To roast the corn, heat the oven to 400°F., and place the husked corn on an oiled sheet pan. Roast, turning every 5 minutes until the corn is browned and soft. Let cool and then cut the kernels from the cob. You should get about 1 cup.
  2. For the cornbread, heat the oven to 400°F. Butter or grease an 8-inch square metal pan. In a medium bowl, combine the flour, cornmeal, sugar, baking powder and salt, and whisk to combine. Place the yogurt, melted butter and eggs in a medium bowl and whisk to combine. Pour the yogurt mixture over the cornmeal mixture and stir until almost mixed, then add the roasted corn and stir just until the ingredients are combined. Scrape the batter into the prepared pan and smooth the top. Bake for 15 to 20 minutes, until a toothpick inserted in the center of the pan comes out with no wet batter attached. Let cool in the pan for 5 minutes before serving. Cut 3 by 3 to make 9 squares.  

Serving Suggestion

Cornbread is always a treat, but when you have some leftover grilled corn, you have a fantastic addition to a pan of golden goodness. The one makes a great side for beans, soups and greens.

Raspberry Agave Sorbet

Sorbet is a refreshing and light alternative to ice cream. Try it layered in parfaits, floated in berry sangria, or on top of another berry desserts, such as cobbler. In this version, using agave syrup means that you can skip the traditional step of making a syrup from sugar, since agave dissolves in cold water.

Raspberry Sorbet

Ingredients

  • 12 ounces frozen or fresh raspberries
  • 1/2 cup light agave syrup
  • 1/2 cup water
  • 1/2 teaspoon vanilla

Equipment

  • Ice cream maker or food processor

Preparation

  1. If using an ice cream maker, have it chilled and ready to go (if using the freezer method, have an ice cube tray or cookie tin lined with parchment paper ready to go). Place a fine wire screen strainer over a bowl, which you'll use to strain the raspberry puree.
  2. In a food processor or blender, puree the raspberries until smooth. Use a rubber spatula to scrape the puree into the wire strainer, and then to press the puree through. Scrape and move the fruit pulp until all you have left are seeds. You should have about one cup of puree. Stir in the agave, water and vanilla, then chill until very cold.
  3. Use the ice cream maker to freeze the sorbet. If desired, transfer to a storage tub and freeze until ready to use. (If using the freezer method, pour the sorbet mixture into the ice cube trays or onto the parchment lined cookie tray and freeze. Break the frozen sorbet mixture into chunks, if using a cookie tray, and puree the chunks in a food processor before serving.)


Photo via Creative Commons. 

Authored by Robin Asbell. Reprinted by permission from StrongerTogether.coop. Find articles about your food and where it comes from, recipes and a whole lot more at www.strongertogether.coop.

DIY Quick Pickles

Pickling can be just that—a pickle. True pickling is an ancient miracle for food preservation, but involves a drawn-out fermentation process requiring canning equipment, sterilization procedures and a whole lotta waiting around.

But, did you know that there’s a fast and easy way to preserve and chill your fresh garden veggies? Follow these quick pickling steps for those of you not ready to go all in. 

DIY Quick Pickle

1. Pick your pickle

Although cucumbers are the most common for pickling, you can pickle almost any vegetable such as baby carrots (not the bitty mature carrots which you find in packages, but miniature immature ones with the skin still on), shallots, onion, asparagus, cauliflower, green beans, zucchini, okra, and beyond. The fresher and crispier the produce, the better the final product.

2. Prep the potion

The main ingredient in pickle brine is vinegar. White vinegar is most common, but you can also use cider vinegar or wine vinegar. Balsamic is not recommended as it’s too syrupy. Combine 1 cup vinegar with 1/2 cup water in a saucepan. Instead of diluting the vinegar with water, try including a 1/2 cup of white or brown sugar with a dash of cinnamon.

Add a few pinches of salt. Salt draws moisture out of the vegetables and encourages the growth of useful bacteria. 

5. Spice it up 

This is where it gets fun. Many "pickling spice" blends are available and work beautifully, but consider a visit to the bulk aisle at your local food co-op to customize your blend. Mustard seed, dill seed, dry coriander seed, red pepper flakes, bay leaf, black peppercorns and garlic are all great places to start.

Combine all the ingredients in the saucepan, stir to dissolve, and bring to a boil.

3. Prep your veggies

Trim off any inedible pieces of your vegetable (e.g., the ends of green beans or root ends of onions). If you're cutting your vegetables into pieces, make sure they're all about the same size for pickling consistency.

Leeks and carrots make great pickled veggies.

Leeks and carrots make great pickled veggies.

4. Submerge and chill

Place your vegetables in a clean, dry container. Glass jars are the best because they won’t absorb any odors from the pickles.

Pour the boiling brine into the jar and submerge the veggies completely (you can add water to bring up the level if needed). Refrigerate for at least one hour and let the brine work its charms. The longer you brine, the tastier the pickle.

Depending on your veggie, quick pickles will keep in the fridge for weeks to a few months. 


Reprinted by permission from StrongerTogether.coop. Find articles about your food and where it comes from, recipes and a whole lot more at www.strongertogether.coop.
 

LA Inspired Street Food: Fruit Salad

Rainbow Umbrella Fruit Cart

If you’ve been to Los Angeles, you may be familiar with the fruit carts sprinkled throughout the city’s many neighborhoods. Carts are typically situated on street corners topped with a rainbow umbrella. Once you spot one, they’re hard to miss.

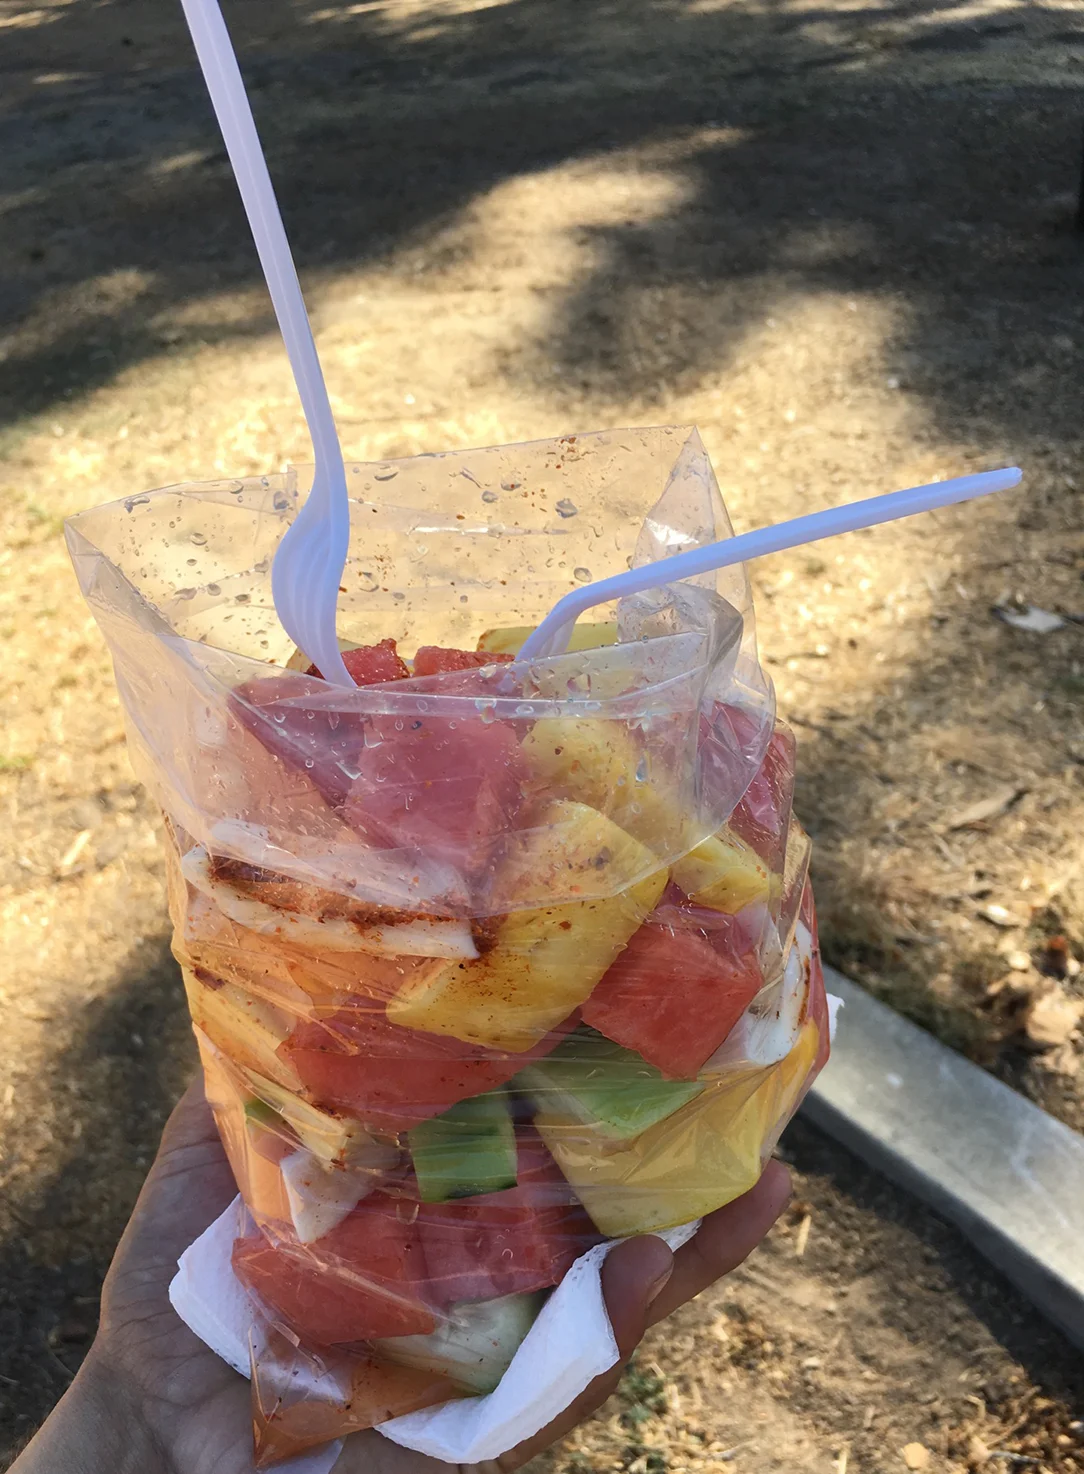
No matter where you are in the city, vendors stock their carts with the same tools and ingredients - a cutting board, a sharp knife, Ziploc bags, and a bounty of fresh fruits on ice. The secret to this fruit salad is the seasoning. Tajín, a spicy Mexican salt, combines with fresh lime juice for an extra kick and refreshing treat.

LA fruit vendors load up a ziploc bag to be enjoyed on-the-go.

LA fruit vendors load up a ziploc bag to be enjoyed on-the-go.

Like any fruit salad, this recipe is very forgiving and can be completely tailored to your tastes. LA fruit carts traditionally use tropical fruits, like mango, melons, and pineapple, but feel free to substitute as you please.

Ingredients

  • 1 small watermelon
  • 1 cantaloupe
  • 1 jicama
  • 1 pineapple
  • 1 cucumber, peeled and seeded
  • 2 mangos
  • 1 papaya
  • Healthy dash of Tajín or chili powder
  • Juice of 1 lime

Preparation

Chop fruits into bite sized pieces. Toss fruits with lime juice and Tajín salt or chili powder. Add an extra dash of Tajín if you can handle the heat.

Serving Suggestion

Serve in a bowl at your upcoming summer bbq. Throw the salad in a Ziploc bag and enjoy on-the-go like a native Angeleno.

Green Bean Fries

These green bean “fries” are perfect as a snack or served along with sandwiches. Kids love them with creamy low-fat dressing as a dip.

Ingredients

  • 1 pound green beans, trimmed
  • 2 eggs
  • 1 cup milk
  • 1 cup flour
  • 2 cups bread crumbs
  • 1/2 cup grated Parmigiano Reggiano cheese
  • 2 teaspoons garlic powder
  • 2 teaspoons onion powder
  • 2 teaspoons oregano, dried
  • 3 tablespoons lemon zest (optional)

Preparation

  1. Preheat oven to 350 degrees F.
  2. In a medium stockpot, bring 3 inches of salted water to a boil. Add the green beans and cook for 3 minutes, remove from heat, drain and immerse in cold water to cool. Drain and set aside. In a small bowl, combine the breadcrumbs, Parmigiano Reggiano cheese and oregano with the onion and garlic powders.
  3. In a wide bottom bowl, blend together the eggs and milk. Place half the flour on a wide plate, and half the bread crumbs on another plate. Working in small batches, place green beans in the flour and coat well. Remove the beans from the flour, shaking off any excess, and place them into the egg wash and coat well. Use a pair of tongs to remove the beans from the egg wash and place into the breadcrumb mixture. Coat well with bread crumbs and place the coated beans onto a large baking sheet in a single layer. Repeat the steps with the remaining beans.
  4. Bake the beans for 18-20 minutes until crisp, remove from the oven and serve, garnished with fresh lemon zest.


Reprinted by permission from StrongerTogether.coop. Find articles about your food and where it comes from, recipes and a whole lot more at www.strongertogether.coop

CHOCOLATE CHIP BANANA BREAD

Banana Bread

Ingredients 

  • 2 c. all-purpose flour
  • ¼ c. granulated sugar
  • 1 tsp. vanilla extract
  • 2 tsp. baking powder
  • 1 tsp. baking soda
  • 1 pinch salt
  • 1 bag semi-sweet or bittersweet chocolate chips 
  • 2 c. bananas (2-3 ripe & mashed bananas)
  • ½ c. butter, melted
  • ¼ c. milk
  • 2 eggs
  • Cinnamon for crust (optional)

Preparation 

Preheat oven to 350 degrees. In a large bowl, whisk flour, sugar, baking powder, baking soda and salt. Add chocolate chips.

In a separate bowl, whisk together bananas, butter, milk, vanilla and eggs. Pour over the flour mixture and stir until blended. Grease a 9x5 loaf pan with butter and sprinkle with cinnamon and sugar. Pour mixture into the loaf pan.

Bake for 50 to 60 minutes, until the crust is golden brown and a toothpick comes out clean. Let cool in pan for 15 minutes before turning out onto a rack or serving plate. Serve warm.


Reprinted from Equal Exchange.

Chocolate Covered Frozen Bananas

Via Kara Stout

Via Kara Stout

Ingredients 

  • 4 ripe (but not brown) Equal Exchange bananas, bottoms trimmed, but unpeeled
  • 6 ounces Equal Exchange Organic Dark Chocolate, broken up (choose your favorite bar)
  • 1/4 cup cream (or vegan option= 1 tablespoon coconut oil)
  • 1/2 cup chopped topping of your choice (nuts, candied ginger, crushed cookies, coconut, etc.)

Preparation

  1. Peel bananas. Pierce each banana lengthwise with a wooden skewer freeze for at least 15 minutes, or wrap tightly in plastic or foil and freeze for up to a week.
  2. Melt the chocolate in a double boiler (or self made double boiler), a small saucepan over very low heat, or the microwave. Whisk in the cream or coconut oil and transfer the chocolate mixture to a shallow bowl. If you're using nuts, put them on a plate next to the melted chocolate.
  3. Peel the plastic / foil off bananas, dip them first in the chocolate covering the banana completely, let the chocolate drip off and cool slightly then sprinkle with toppings. Wait a few minutes and then place bananas on a piece of parchment paper in the freezer. Repeat with all of the bananas. The chocolate will cool quickly, so if necessary, reheat chocolate.
  4. Freeze bananas for 30 minutes or until chocolate is hard. You can put them in a wax- paper-lined airtight container and freeze them for longer. 

Banana chocolate pieces modification: Peel bananas, cut into 1-2 inch chunks. Follow steps 2-4, but leave pieces on wax paper in freezer until chocolate is hard, then store in an airtight container.


Reprinted by Equal Exchange.

Avocado Brownies

Brownies are a perfect place to slip in some creamy avocado. In place of some of the butter, avocado adds creaminess with more nutrients and fewer calories. You will never know there's a healthy fruit in there, thanks to the cocoa and vanilla. 

Ingredients

  • 3/4 cup unbleached flour
  • 1/2 cup cocoa
  • 1/2 teaspoon salt
  • 1/4 teaspoon baking soda
  • 3/4 cup mashed avocado (1 large or 2 small)
  • 1/2 cup white sugar
  • 1/2 cup brown sugar
  • 2 large eggs
  • 1/2 cup canola oil or 1 stick melted butter
  • 1 teaspoon vanilla

Preparation

  1. Preheat the oven to 350°F. Lightly oil an 8-inch square baking pan.
  2. In a large bowl, mix the flour, cocoa, salt and baking soda, crushing any lumps of cocoa with the back of your spoon.
  3. In a food processor, puree the avocado until completely smooth. Add the white and brown sugars and process, then add the eggs, oil or butter and vanilla and process until smooth. Scrape the avocado mixture into the flour mixture and stir to combine. Spread the batter in the prepared pan.
  4. Bake for 20-25 minutes, until the top looks dry and a toothpick inserted in the middle of the pan comes out with big wet crumbs attached-not dry. Don't overbake, if you like a gooey brownie, take it out while a little gooey in the middle and chill to make it easier to cut.
  5. Cut into 16 squares and serve.

Serving Suggestions

Serve these tasty brownies plain or dusted with powdered sugar. For a super-chocolate treat, drizzle with melted chocolate.


Authored by Robin Asbell. Reprinted by permission from StrongerTogether.coop. Find articles about your food and where it comes from, recipes and a whole lot more at www.strongertogether.coop

Mango & Berry Popsicles

Coconut and fresh fruit make a perfect treat for a hot day. Use any combination of fresh fruit and coconut water - we're using mango, raspberries, and blueberries. Popsicles are best using a popsicle mold and popsicle stick, however, smaller "popsicles" can be made using an ice tray.   

IMG_85581.jpg


Ingredients

  • 3 mangos (about 3 pounds), peeled, pitted and diced
  • 6 ounces raspberries 6 ounces blueberries
  • 2 cups coconut water
  • 2 tablespoons light agave nectar

Preparation

Gently push raspberries into bottom of Popsicle mold. Place diced mango into mold on top of raspberries, top with blueberries. In a liquid measuring cup, mix coconut water and agave nectar, pour into each mold, about ¼ inch from the top. Insert Popsicle sticks into each pop mold. Freeze overnight. Remove from molds and serve immediately.