Grill

Bean Burgers with Spicy Guacamole

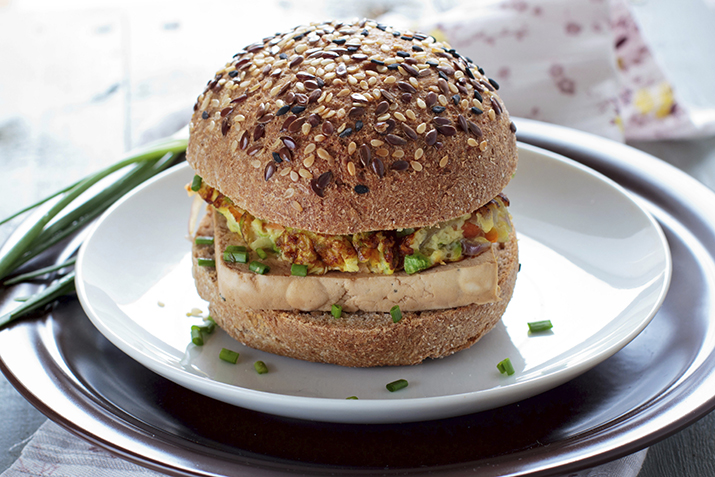
Crunchy cornmeal on the outside and Southwestern flavors on the inside, these bean burgers please all kinds of eaters.

Make burgers one day in advance to save time.

Make burgers one day in advance to save time.

Ingredients

Burgers

  • 1/2 cup water
  • 1/4 cup quinoa, rinsed (see Note)
  • 3 tablespoons extra-virgin olive oil, divided
  • 1/2 cup chopped red onion
  • 1 clove garlic, minced
  • 2 1/2 cups cooked pinto beans, well drained
  • 1 teaspoon smoked paprika
  • 1/2 teaspoon ground toasted cumin seeds (see Tip)
  • 3 tablespoons chopped fresh cilantro
  • 3 tablespoons cornmeal, plus 1/3 cup for coating burgers
  • 1/2 teaspoon salt
  • Freshly ground pepper to taste
  • 6 whole-wheat hamburger buns, toasted
  • 6 lettuce leaves

Guacamole

  • 1 ripe avocado
  • 2 tablespoons finely chopped fresh cilantro
  • 1 tablespoon lemon juice
  • 2 teaspoons finely chopped red onion
  • 1 clove garlic, minced
  • 1/8 teaspoon cayenne pepper, or more to taste

Preparation

  1. Bring water to a boil in a small saucepan. Add quinoa and return to a boil. Reduce to a low simmer, cover and cook until the water has been absorbed, about 10 minutes. Uncover and let stand.
  2. Heat 1 tablespoon oil in a medium skillet over medium heat. Add 1/2 cup onion and garlic and cook, stirring occasionally, until soft and fragrant, about 3 minutes. Add beans, paprika and ground cumin and mash the beans to a smooth paste with a potato masher or fork. Transfer the mixture to a bowl and let cool slightly. Add the quinoa, 3 tablespoons cilantro, 3 tablespoons cornmeal, 1/2 teaspoon salt and pepper; stir to combine.
  3. Form the bean mash into 6 patties. Coat them evenly with the remaining 1/3 cup cornmeal and transfer to a baking sheet. Refrigerate for 20 minutes.
  4. To prepare guacamole: Mash avocado with a potato masher or fork. Stir in 2 tablespoons cilantro, lemon juice, 2 teaspoons onion, garlic, cayenne and 1/8 teaspoon salt.
  5. Preheat oven to 200°F.
  6. Heat 1 tablespoon oil in a large cast-iron (or similar heavy) skillet over medium-high heat. Reduce heat to medium and cook 3 burgers until heated through and brown and crisp on both sides, 2 to 4 minutes per side. Transfer to the oven to keep warm. Cook the remaining 3 burgers with the remaining 1 tablespoon oil, reducing the heat as necessary to prevent over-browning. Serve the burgers on buns with lettuce, tomato and the guacamole.

Tips & Notes

  • Toast cumin seeds in a small skillet over medium heat, stirring occasionally, until very fragrant, 2 to 5 minutes. Let cool. Grind into a powder in a spice mill or blender.
  • Quinoa is a delicately flavored, protein-rich grain. Rinsing removes any residue of saponin, quinoa's natural, bitter protective covering.


Authored by Eatingwell.com. Reprinted by permission from StrongerTogether.coop. Find articles about your food and where it comes from, recipes and a whole lot more at www.strongertogether.coop

Smoked Tofu Burgers

Tofu is like a sponge, soaking up smoke and getting firmer and denser as it sits on the grill. Just keep it on the cool side of the grill and give it plenty of time to get nice and smoky. 

Double the tofu and marinade and grill up an extra batch of tofu to use in sandwiches, salads, and soups for the week.

Tofu Burger

Ingredients

  • 2 tablespoons tamari soy sauce
  • 2 tablespoons cup vegetable oil
  • 1 tablespoons red wine vinegar
  • 1/4 teaspoon smoked paprika
  • 1 block (1-pound)  extra firm tofu
  • 5 whole wheat hamburger buns
  • 5 large lettuce leaves, shredded
  • 1 large tomato, sliced
  • 2 scallions, chopped
  • Ketchup, mustard, barbecue sauce, if desired

Materials

  • 4 cups woodchips, soaked in water
  • 1 spray bottle filled with water
  • Smoker box or foil to make a pouch

Preparation

  1. Mix soy sauce, vegetable oil, wine vinegar and paprika in a square container with a liquid-tight lid large enough to hold all of the tofu. Drain water from tofu and wrap in clean towels, press carefully to soak up water without breaking the tofu. Unwrap tofu and slice into 5 thick slices per block. Place the slices in the marinade, put the lid on the container and turn it over to coat the tofu. Refrigerate the marinating tofu for at least 24 hours or up to three days, turning occasionally to coat.
  2. Prepare the grill for smoking (see Tips & Notes for instructions).
  3. When the grill is ready and the cool side of the grate is oiled, place the tofu on the grate. Close the lid, opening it once every 10 minutes to quickly turn the tofu. Smoke tofu for 40 minutes.
  4. Serve on buns with lettuce, tomato, and condiments of choice.

Tips & Notes

1. Create hot and cool zones

For best smoking results, create hot and cool zones on the grill. The hot zone is where the smoke is created and the food may be seared. The cool zone is where the food is placed to allow the food to cook more slowly and absorb the smoky flavor. If your grill is too small to create both a hot and a cool zone, check your food for doneness earlier as it will cook faster over the high heat

2. Prepare your grill for smoking

Heat the grill

Gas grills: Remove the grate, then turn the gas on high. If your grill has more than one burner, use a single burner on one side. Once the grill is hot, place the smoker box filled with soaked woodchips, or a foil pouch filled with the same, on the hot side of the grill. Replace the grate.

Charcoal grills: remove the grate, pile the charcoal to one side and light it. Heat until it is hot and covered with white ash. Place the smoker box filled with soaked woodchips, or a foil pouch filled with the same, directly on the coals and replace the grate.

Get the woodchips smoking

Allow the woodchips to start smoking. Once you smell the smoke and see wisps of it, you are ready to smoke your food.

3. Smoke your food

Pour a couple tablespoons oil into a cup. Dip a clean paper towel into the oil, hold it with tongs and quickly oil the cool side of the grate (if there are no hot and cool zones on your grill, oil wherever you plan to place the food). Place the food on the oiled grate and quickly cover the grill to allow the food to cook and absorb the smoky flavor.

4. Keep the flames in check

Have a spray bottle of water ready to douse out any flare-ups.


Authored by Robin Asbell. Reprinted by permission from StrongerTogether.coop. Find articles about your food and where it comes from, recipes and a whole lot more at www.strongertogether.coop

Grilled Romaine Salad

Use the grill for more than just meat this summer by grilling your salad, too. Romaine is hearty and lends itself perfectly to grilling.

Pile on veggies of your choice for a complete grilled romaine salad. 

Pile on veggies of your choice for a complete grilled romaine salad. 

Ingredients

Salad

  • 1 large head romaine lettuce
  • 1 ear corn
  • 2 slices day-old bread
  • 1/2 avocado, chopped
  • 1/4 medium red onion, thinly sliced
  • 2 tablespoons extra virgin olive oil, divided

Dressing

  • 1/4 cup freshly grated Parmesan cheese
  • 1 tablespoons lemon juice
  • 2 tablespoons extra virgin olive oil
  • 1 tablespoon balsamic vinegar
  • 1/4 teaspoon freshly ground black pepper

Preparation

  1. Make the dressing by whisking together the cheese and lemon juice in a small bowl. Add the olive oil, balsamic and black pepper and whisk again until incorporated. Set aside.
  2. Preheat an outdoor grill or stove top grill pan to medium-low, about 350⁰F.
  3. Place the corn on the grill and grill for about 4-5 minutes per side until the kernels start to char. Remove from grill once the whole ear is slightly charred, cut the kernels off the cob and set aside.
  4. While the corn grills, drizzle the bread with 1 tablespoon of olive oil and place on the grill for about 1-2 minutes per side until just slightly toasted and grill marks appear. Remove from the grill and cut into cubes.
  5. Cut the head of romaine in half lengthwise keeping the core intact. Wash each half thoroughly, gently shake off any excess water and dry well.
  6. Drizzle both halves of romaine (cut side) with the remaining tablespoon of olive oil. Place the lettuce halves on the grill, cut side down and grill for 1-2 minutes per side until the outer leaves just start to wilt and the core has some nice grill marks.
  7. Plate the grilled romaine on a serving platter, top with the grilled corn kernels, sliced red onion, chopped avocado and grilled croutons.
  8. Drizzle the dressing on top and serve warm.

Serving Suggestion

Add chopped hard-boiled egg or cooked chicken for a complete meal.

Garnet Yam Burgers

Sweet potatoes, chickpeas, millet and spices team up for a fabulous burger.

Garnet yam burger

Garnet yam burger

Ingredients

  • 1 1/2 cups vegetable broth
  • 1 cup peeled and diced garnet yams or sweet potatoes
  • 1/4 cup diced yellow onion
  • 2 cloves garlic, minced
  • 1/2 cup canned chickpeas, rinsed, drained and smashed
  • 1/2 cup millet
  • 1 teaspoon cumin
  • 1 1/2 teaspoons chili powder
  • 2 teaspoons vegetarian Worcestershire
  • Salt
  • 1 cup bread crumbs, divided
  • 1 egg, beaten
  • 1 to 2 tablespoons vegetable oil

Preparation

  1. Bring the vegetable broth to a boil in a medium soup pot. Add the yams and simmer for about 8 minutes, just until the yams are getting tender. Add the onion, garlic, chickpeas and millet, cover the pot and simmer for another 20 minutes, stirring occasionally. The millet should be tender and the liquid should be entirely absorbed when done.
  2. Remove from heat and stir in the cumin, chili powder, Worcestershire, a pinch of salt and half of the bread crumbs. Stir well and form into 6 even burgers.
  3. Put the beaten egg in a small dish and the remaining bread crumbs in another small dish or plate. Gently dip each burger in the egg, and then coat well in bread crumbs. Place the burgers on a sheet pan or plate and refrigerate for about 30 minutes.
  4. Heat the vegetable oil over medium-high heat in a large skillet. Add the yam burgers to the pan and cook for 4 to 5 minutes until browned well on one side. Gently flip the burgers and cook another 4 to 5 minutes.

Serving Suggestion

Serve on a toasted whole-wheat bun with Sriracha mayonnaise, sliced pickled jalapeños and crispy lettuce, or sweet pickles, ketchup and mustard if you prefer. Or make this a main course option for vegetarian holiday guests!


Reprinted with permission from StrongerTogether.coop. Find articles about your food and where it comes from, recipes and a whole lot more at www.strongertogether.coop. Photo provided by Wholehearted Eats.

Top 5 Affordable Steak Cuts

Meat_Your_Top_5_Affordable_Steak_Cuts.jpg

1. Chuck eye

If you want to grill a flavorful steak on a tight budget, look no further than the chuck eye. The chuck eye lives on the butcher’s edge between the chuck and the more renowned rib eye.

This cut has rich flavor and nice meat-to-fat balance similar to rib eye, but costs less. Perfect for grilling or pot roasts.

2. Flat iron steak

Versatile and untraditional, the flat iron cut (also known as “top blade”) comes from the shoulder of the cow. A trendy cut popular among food chains and upscale restaurants alike, a flat iron steak can be grilled, braised, pan fried, marinated, and everything in between. The bonus? It’s affordable. This meat – although tougher than a sirloin or fillet – has delicious flavor.

Get creative: this cut can be cooked in many ways, just be sure to not overcook it.

3. Flank steak

Skirt steak is a cut of meat from the plate – the long, flat, and flavorful bottom ribs of the cow. Flank steak is a similar cut. Both skirt and flank steak cuts can be used in a variety of dishes, most common in Colombian (think fajitas) and Asian-style stir fries. Flank steak is best when sliced across the grain before serving.

Grill, pan-fry, broil or braise for increased tenderness.

4. Tip sirloin

The sirloin is a large area cut from the rear back portion of the cow. The most prized and tender of this area is top sirloin. If you’re looking for something a little easier on the wallet, the tip sirloin is a leaner horseshoe-shaped cut ideal for cutlets, stir-fry, kebabs, and stew.

Because it’s lean, tip sirloin can be dry and chewy, so it should be marinated for a few hours before grilling, broiling or pan-searing.

5. Gunnin’ for chuck arm steak

The chuck arm comes from that larger chuck area surrounding ribs one through five. The muscles in this area get a lot of work, so the meat tends to be tough, but this makes it ideal for kebabs and stews. Also, the cuts from this area are plentiful, thus cheap! Pair with some grilled veggies for a saucy combo fit for late-night fiestas.

Perfect for braising (grilling not recommended).

How to use Halloumi

If you haven't yet tried this unusual cheese, you're in for a treat—and a fun, delicious new addition to your grilling repertoire. Halloumi has been made in Cyprus, Greece for centuries. Traditionally made from unpasteurized sheep and goat's milk, Halloumi was often wrapped with mint leaves, which was used as a preservative, and, even now the cheese is often sold with mint as a garnish. The Halloumi from Cyprus has a Protected Designation of Origin (PDO), but "Halloumi-style" cheese is now made throughout the world.

Halloumi2_0.jpg

While you can eat Halloumi raw, it's usually enjoyed cooked—not just because you can, but also because cooking improves the taste and texture. Some of the saltiness (from brining) fades as it cooks. If you find Halloumi a bit too salty for your taste, simply simmer it in water for five minutes. Then refrigerate until firm again before cooking. The texture, which starts out a bit like mozzarella, becomes a bit creamier with cooking.

Halloumi will keep in the refrigerator unopened for as long as a year. Once opened, store it in the refrigerator in salt water in an airtight container for up to two weeks, or wrap it tightly in waxed paper, parchment paper or cheese wrap. Rewrap in fresh paper whenever you unwrap it. The cheese can also be frozen for a few months. Thaw it in the refrigerator a day before you want to use it.

Find some of our favorite Halloumi serving styles below.

Grilled Halloumi

To make grilled Halloumi, simply slide the cheese onto wooden skewers that have been soaked in water first. Drizzle the cheese with olive oil and sprinkle with spices, if you like. Cook the skewered cheese just two to three minutes on each side, until it's warmed through. Large pieces of Halloumi can simply be placed directly on the grill, or you can also fry Halloumi in a skillet.

Marinated Halloumi

Marinate the cheese before cooking—in olive oil, lemon juice, garlic, red pepper, oregano or combinations of other spices, such as cumin, chili powder, ground ginger or fresh herbs like thyme, mint, basil or rosemary for extra flavor.

Cypriot-style

Cypriot-style pairs Halloumi with watermelon, or with smoked pork or lamb sausage. Use it on sandwiches (it's delicious in pita with cucumbers and tomatoes), to stuff ravioli, and over pasta, potatoes, or salads (toss the grilled cheese with any greens, and try it in place of mozzarella in a Caprese salad). Place Halloumi on kebabs with veggies. Serve it with eggs for breakfast, and on grilled burgers (meat or veggie) and eggplant. Here's a tasty recipe for Grilled Eggplant Napoleon.

Honey & Halloumi

Try drizzling the cheese with honey—which plays off the saltiness—and serving on a cheese tray. A lager makes a perfect accompaniment.

The Fruit and Veggie Grilling Guide

While most people associate outdoor grilling with burgers, hot dogs, and steaks, the grill imparts big flavors to fruits and veggies, too. A wide array of produce paired with spice rubs, marinades and sauces will keep your patio table overflowing with delicious additions to your grilling repertoire. Seasonal summer vegetables are perfect for grilling: zucchini, eggplant and bell peppers are naturally tender and become even sweeter on the grill. Slice these vegetables about 1/4-inch thick and toss them in an easy marinade for 30 minutes (or better yet, overnight) before grilling for a few minutes per side.

grilled-peaches.jpg

A simple combination of wine vinegar, olive oil, chopped garlic and herbs, and salt and pepper are all you need for a tasty marinade. This easy mix will turn grilled vegetables into Italian antipasti to serve with bread, olives, and cheese. Change the blend to vegetable oil, sesame oil, soy sauce, rice vinegar, and chopped garlic and ginger for Asian-flavored vegetables that are delicious with rice. Store-bought dressings with a vinegar base make wonderful marinades as well.

Summertime peaches, apricots, nectarines, and figs are delicious grilled. Cut fruit in half and remove any pits, then coat lightly with oil. For a sweet-savory side dish to grilled pork, chicken, or lamb, sprinkle on a little salt, pepper, and balsamic vinegar, then grill for a few minutes per side. And for dessert, dust with brown sugar, then place the halves on a clean part of the grill for a few minutes per side before serving with ice cream or pound cake (or both).

Some grilling tips:

  • Use moderate heat (not high); if it’s a charcoal grill, move the charcoal to one side and grill your fruits and veggies on the other side, over indirect heat.
  • Be sure to oil your grill thoroughly—fruits and vegetables are high in natural sugars, which means they can easily burn and stick to the grill. Before you begin cooking, clean the grill well, preheat it, and then use several layers of paper towel dipped in vegetable oil to grease it.
  • Cut vegetables into the largest possible pieces to prevent them from falling through the grill grate and avoid extra time spent flipping more pieces. For example, cut zucchini in slices along the length of the vegetable, rather than slicing into small rounds.
  • Corn doesn’t always cook through on the grill. Blanch it in boiling water for a few minutes, then grill for 5 to 10 minutes to finish cooking and add smoky flavor.


Photo credit: Mike McCune

Choosing the Perfect Steak

The key to a delicious steak is choosing the right cut of meat. Johnny Livesay, of Austin's Black Star Co-op, discusses marbling, grass-fed versus grain-fed beef, and the best cuts for your budget. The key to a delicious steak is choosing the right cut of meat. Johnny Livesay discusses marbling, grass-fed versus grain-fed beef, and the best cuts for your budget.